One of the least costly approaches to give your floor a facelift is self-adhesive vinyl tile flooring Phoenix. You can apply peel-and-stick vinyl tiles to a current floor after first putting down an underlayment and primer. Even if your current floor is in great condition, self-adhesive tiles won't last if you install them without underlayment and primer. The only exception is vinyl tiles with built-in underlayment. Regardless, vinyl tile installation represents one of the easiest installation processes according to many vinyl tile stores. Follow the following steps for effective installation of self-stick adhesive tiles.
Pre-requisites
Before initiating the vinyl tile installation process, remember to fulfill all the prerequisites that are listed below:
1. Make sure that the floor is thoroughly swept in order to install the vinyl tile flooring Phoenix. Even the smallest amount of dust can interfere with the
adhesive of vinyl tile flooring.
2. After sweeping the floor thoroughly, mop it using a mixture of 1/4 cup ammonia in a gallon of water. Let the floor dry. Apply underlayment and primer, per package directions.
3. Then draw chalk lines on the flooring, dividing the room into quarters so that vinyl tile installation becomes easier. Measure the center points of two opposite walls and stretch twine between them. Then mark the chalk lines along the way. Do the same for the other two walls.
The Procedure
The vinyl tile stores suggest that
installing vinyl tile flooring Phoenix is easy and can be done by the homeowners themselves as well.
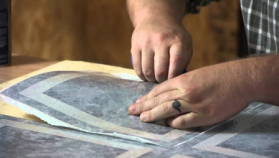
1. Place the main tile at the point of the two chalk marks, lining it up precisely. Lift it and take a look at which direction the arrows on the back of the paper are indicating.
2. Peel the back off of the primary tile and place it in the focal point of the floor where the two chalk marks meet.
3. Roll the tile down with the rolling pin. This helps the self-adhesive on the back to stick to your floor by squeezing out air bubbles.
4. Check the arrows on the second tile and place it with one edge against the middle tile and one edge against a chalk mark. Peel the back off, press it into spot and reveal the air bubbles.
5. Place your tiles on the floor by filling one-fourth of the room at once. The nearer you place the tiles into each other, the more durable the floor will be and the more professional it will look.
6. While the
vinyl tile installation is done for the last row nearing the wall, measure the space left, mark it on the tile and cut it appropriately using the tile cutter.
7. Place it with the sliced edge beside the divider as opposed to meeting the tiles that are now set up. Proceed until the whole room is tiled.


 One of the least costly approaches to give your floor a facelift is self-adhesive vinyl tile flooring Phoenix. You can apply peel-and-stick vinyl tiles to a current floor after first putting down an underlayment and primer. Even if your current floor is in great condition, self-adhesive tiles won't last if you install them without underlayment and primer. The only exception is vinyl tiles with built-in underlayment. Regardless, vinyl tile installation represents one of the easiest installation processes according to many vinyl tile stores. Follow the following steps for effective installation of self-stick adhesive tiles.Pre-requisites
 Admin0 Comments